How I Transformed VS Code Into a Cozy, Minimalist Workspace (Full Setup Guide)
If you've ever opened VS Code and felt like you were staring at the cockpit of a spaceship - activity bars, status bars, breadcrumbs, line numbers, a minimap, sidebars - you're not alone. Out of the box, VS Code is powerful, but it can also feel really cluttered, especially when all you want to do is sit down and write some code.
I've been tweaking my setup for a while now, and I finally landed on something that feels genuinely calm and focused. No unnecessary noise. Just the code, a nice font, and (okay, a little pet running around in the sidebar). Consider this my VS Code setup guide for a proper VS Code minimalist setup, the kind that makes distraction-free coding the default. In this post, I'm going to walk you through my exact setup - step by step - so you can recreate it yourself, even if you're fairly new to VS Code.
By the end of this guide, you'll have:
- A clean, distraction-free editor layout
- A beautiful minimal theme and icon pack
- A set of must-have extensions
- My full
settings.jsonyou can copy and paste in 30 seconds
Let's get into it.
What We're Starting With (And Where We're Going)
Here's the thing: the default VS Code UI isn't bad, it's just designed to show everything at once. For beginners, that's actually helpful - you can see all the buttons and options. But once you know where things are, a lot of that UI becomes visual noise.
The transformation is pretty dramatic. And the best part? You're not removing functionality. Everything is still there. You're just hiding what you don't need on a day-to-day basis, so you can focus on what actually matters.
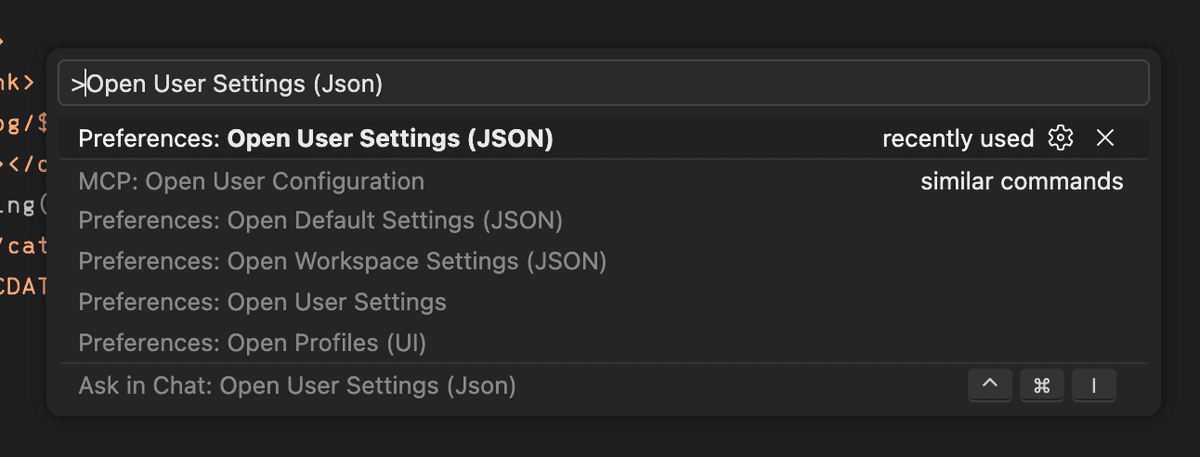
Step 1: Open Your settings.json File
Everything in this guide lives in a single file called settings.json. This VS Code settings JSON file is the main config for the editor, and editing it is the fastest way to customize your entire setup.
Here's how to open it:
On Mac:
- Press
Cmd + Shift + Pto open the Command Palette - Type
Open User Settings (JSON) - Click the result - it looks like
Preferences: Open User Settings (JSON)
On Windows/Linux:
- Press
Ctrl + Shift + Pto open the Command Palette - Type
Open User Settings (JSON) - Click the result
You'll see a file that looks something like this:
{
  "editor.fontSize": 14,
  "workbench.colorTheme": "Default Dark+"
}
This is where all your configuration lives. Throughout this guide, I'll be showing you settings to add or update here. At the very bottom of the post, you'll find my complete settings.json that you can copy and paste all at once if you prefer.
Step 2: Install a Beautiful Font
One of the biggest upgrades you can make to your coding experience is switching to a better monospace font. The default VS Code font is fine, but it's not inspiring.
Option A: Brass Mono (My Pick)
Brass Mono is the font I currently use. It's clean, well-spaced, and has a slightly warm, organic feel to it - very different from the cold, technical look of most coding fonts. It makes long coding sessions way more comfortable.
Download it here: github.com/fonsecapeter/brass_mono

Option B: Fira Code (Great if You Want Ligatures)
If you want font ligatures - where symbols like =>, !==, and -> merge into a single, cleaner glyph - then Fira Code is an excellent choice. It's one of the most popular coding fonts in the world for a reason.
Download it here: github.com/tonsky/FiraCode
![]()
How to Install a Font
Once you've downloaded your chosen font:
- Unzip the downloaded file
- Open the font file (usually a
.ttfor.otffile) - Click Install (Mac will show a Font Book preview; Windows shows an Install button)
- Restart VS Code so it picks up the new font
Then add this to your settings.json:
"editor.fontFamily": "Brass Mono, monospace",
"editor.fontSize": 14,
"editor.lineHeight": 1.6,
"editor.letterSpacing": 0.3
💡 Tip: The
lineHeight: 1.6setting is underrated. It adds a little breathing room between lines of code, which makes it much easier to read at a glance.
Step 3: Install a Minimal Theme
The theme controls the colors of everything - your syntax highlighting, background, sidebar, and more. For a clean VS Code theme I use Min Theme, which is exactly what it sounds like: minimal, clean, and available in both dark and light variants.
Installing Min Theme
- Open the Extensions panel with
Cmd/Ctrl + Shift + X - Search for Min Theme
- Click Install
- Press
Cmd/Ctrl + K, thenCmd/Ctrl + Tto open the theme picker - Select Min Dark or Min Light
Or add this to your settings.json:
"workbench.colorTheme": "Min Dark"That said - theme is 100% personal preference. If you have one you love already, keep it! The rest of this guide will still apply.
Step 4: Install a Minimal Icon Pack
The file icons in VS Code's sidebar make it easier to tell files apart at a glance. The default icons are okay, but Symbols is a much cleaner option - simple, monochrome shapes that don't fight for attention.
Installing Symbols
- Open Extensions:
Cmd/Ctrl + Shift + X - Search for Symbols (by Miguel Solorio)
- Click Install
Then add to settings.json:
"workbench.iconTheme": "symbols"Step 5: Clean Up the UI Layout
This is the core of the minimalist transformation. We're going to hide a bunch of UI chrome that you probably haven't thought about much, but that's quietly adding clutter to your editor every single day.
Here's what we're hiding and why:
Hide the Status Bar
The status bar at the bottom shows things like your current branch, language mode, and encoding. Useful sometimes - but you can get all that information on demand anyway.
"workbench.statusBar.visible": falseMove the Activity Bar to the Top
By default the activity bar (with icons for Explorer, Search, Git, Extensions, etc.) sits on the left side and takes up a vertical column of space. Moving it to the top frees up horizontal space for your code.
"workbench.activityBar.location": "top"Disable the Command Center
VS Code added a big search bar in the title bar called the Command Center. If you use Cmd/Ctrl + Shift + P to run commands (which you should), you don't need this.
"window.commandCenter": falseTurn Off Breadcrumbs
Breadcrumbs show you the file path and symbol hierarchy at the top of the editor. Handy for navigating large codebases, but just noise for most day-to-day work.
"breadcrumbs.enabled": falseDisable the Minimap
The minimap is that tiny birds-eye view of your code on the right side of the editor. It looks cool, but in practice almost nobody uses it for navigation once they know keyboard shortcuts.
"editor.minimap.enabled": falseHide Line Numbers
This one's controversial - I know! But hear me out. Once you're comfortable with VS Code, you rarely actually need to see line numbers. Removing them gives the editor a much cleaner, document-like feel. Error messages still tell you the line number; you can jump to any line with Ctrl + G.
"editor.lineNumbers": "off"💡 Not ready to go lineless? Try
"editor.lineNumbers": "relative"instead - it shows numbers relative to your cursor position, which is super useful if you use Vim motions.
Remove Indentation Guides
Those faint vertical lines that show indentation levels? Gone.
"editor.guides.indentation": falseRemove Code Folding Arrows
Those little arrows in the gutter that let you collapse blocks of code. If you don't use them, they're just visual clutter.
"editor.folding": falseStep 6: Set Up the Terminal to Match
If you use the integrated terminal (and you should - it's really handy), make sure it matches your editor's font so everything looks consistent.
"terminal.integrated.fontFamily": "Brass Mono, monospace",
"terminal.integrated.fontSize": 14,
"terminal.integrated.lineHeight": 1.6
Step 7: Configure Your Code Formatting
Good formatting settings mean you spend less time thinking about whitespace and more time thinking about code. I use the Prettier VS Code extension for automatic formatting.
Install Prettier
- Open Extensions:
Cmd/Ctrl + Shift + X - Search for Prettier - Code formatter
- Click Install
Then add these settings:
"editor.defaultFormatter": "esbenp.prettier-vscode",
"prettier.tabWidth": 2,
"prettier.useTabs": false,
"editor.formatOnSave": false,
"editor.tabSize": 2,
"files.trimTrailingWhitespace": true,
"files.insertFinalNewline": true,
"files.trimFinalNewlines": true
💡 Note on
formatOnSave: I keep this set tofalsebecause I prefer to format manually when I'm ready. If you want your code auto-formatted every time you save (which a lot of people prefer!), change this totrue.
Suppress Tailwind CSS Warnings
If you use Tailwind CSS, you'll get annoying "Unknown at-rule" warnings for things like @tailwind and @apply. Silence them with:
"css.lint.unknownAtRules": "ignore",
"scss.lint.unknownAtRules": "ignore",
"less.lint.unknownAtRules": "ignore"
Step 8: Improve Navigation Behavior
These small tweaks make navigating your codebase feel snappier and less interrupting.
"editor.gotoLocation.multipleReferences": "goto",
"editor.gotoLocation.multipleDefinitions": "goto",
"editor.gotoLocation.multipleDeclarations": "goto",
"editor.gotoLocation.multipleImplementations": "goto",
"editor.gotoLocation.multipleTypeDefinitions": "goto",
"workbench.editor.enablePreviewFromQuickOpen": false
The goto settings mean that when you press F12 to go to a definition, VS Code jumps straight there instead of showing you a picker - much less friction. The enablePreviewFromQuickOpen: false setting stops VS Code from opening files in "preview mode" (that italic tab title) when you open them with Ctrl/Cmd + P.
Step 9: Install Must-Have Extensions
These are the best VS Code extensions I have found for a great development experience, the ones I consider essential. Most of them work quietly in the background and just make things better without getting in the way.
For Code Quality
| Extension | What it does |
|---|---|
| Error Lens | Shows errors and warnings inline next to your code, instead of making you hover over the red squiggles |
| SonarQube for IDE | Catches bugs, code smells, and security vulnerabilities as you type |
| Code Spell Checker | Catches typos in your code and comments (more useful than you'd think!) |
| Pretty TypeScript Errors | Makes TypeScript error messages actually readable |
For Workflow
| Extension | What it does |
|---|---|
| GitLens | Supercharges the built-in Git integration - shows who wrote each line, rich history, and much more |
| Prettier - Code formatter | Automatic, opinionated code formatting |
| Auto Rename Tag | Automatically renames the closing HTML/JSX tag when you rename the opening one |
| Import Cost | Shows the file size of imported packages inline - great for keeping bundle sizes down |
For Specific Tech
| Extension | What it does |
|---|---|
| Tailwind CSS IntelliSense | Autocomplete, linting, and hover previews for Tailwind classes |
| Image Preview | Shows a thumbnail of image files in the gutter and on hover |
For Fun 🐾
vscode-pets - This one doesn't make you more productive at all. It adds a little pet (cat, dog, snake, and more) that runs around in a panel while you work. You can set the background theme, pet size, and even throw a ball with your mouse. It's ridiculous and I love it.
"vscode-pets.theme": "forest",
"vscode-pets.throwBallWithMouse": true,
"vscode-pets.petSize": "small"
Step 10: Hide Clutter from the File Explorer
If you're working on a JavaScript/TypeScript project, your node_modules and .next folders are constantly showing up in the explorer and it's really annoying. Hide them:
"files.exclude": {
  "**/.next": true,
  "**/node_modules": true
}
You can add any folders or file patterns here that you never want to see in the explorer.
💡 If those
node_modulesfolders bother you beyond just the explorer, the package manager you choose makes a big difference — see NPM vs Yarn vs pnpm vs Bun for how pnpm and Bun cut the disk bloat.
The Complete settings.json
Here's everything in one place. Open your settings.json (Cmd/Ctrl + Shift + P → Open User Settings (JSON)) and paste this in:
{
  // ─────────────────────────────────────────────
  // WORKBENCH / UI LAYOUT
  // ─────────────────────────────────────────────

  "workbench.activityBar.location": "top", // Move the activity bar (Explorer, Git, etc.) to the top
  "window.commandCenter": false, // Disable the large command center search bar
  "workbench.iconTheme": "symbols", // Minimal icon pack
  "workbench.colorTheme": "Min Dark", // Color theme
  "workbench.statusBar.visible": false, // Hide the status bar for a cleaner UI
  "window.newWindowDimensions": "inherit", // New windows inherit the current window size
  "window.nativeFullScreen": true, // Use OS native fullscreen behavior
  "breadcrumbs.enabled": false, // Disable breadcrumbs navigation bar

  // ─────────────────────────────────────────────
  // FONTS & TYPOGRAPHY
  // ─────────────────────────────────────────────

  "editor.fontFamily": "Brass Mono, monospace", // Main editor font
  "editor.fontSize": 14, // Editor font size
  "editor.lineHeight": 1.6, // Improve readability of code spacing
  "editor.letterSpacing": 0.3, // Slight spacing between letters (optional aesthetic tweak)

  // ─────────────────────────────────────────────
  // TERMINAL APPEARANCE
  // ─────────────────────────────────────────────

  "terminal.integrated.fontFamily": "Brass Mono, monospace", // Terminal font
  "terminal.integrated.fontSize": 14, // Terminal font size
  "terminal.integrated.lineHeight": 1.6, // Extra spacing for terminal readability

  // ─────────────────────────────────────────────
  // FORMATTER / CODE STYLE
  // ─────────────────────────────────────────────

  "editor.defaultFormatter": "esbenp.prettier-vscode", // Use Prettier as the default formatter
  "prettier.tabWidth": 2, // Number of spaces per indentation level
  "prettier.useTabs": false, // Use spaces instead of tabs

  "editor.formatOnSave": false, // Format files automatically when saving
  "editor.insertSpaces": false, // Use spaces instead of tabs
  "editor.tabSize": 2, // Number of spaces per indentation level

  "files.trimTrailingWhitespace": true, // Remove trailing whitespace when saving
  "files.insertFinalNewline": true, // Ensure every file ends with a newline (POSIX standard)
  "files.trimFinalNewlines": true, // Remove multiple blank lines at end of file

  "css.lint.unknownAtRules": "ignore", // Ignore Tailwind warnings
  "scss.lint.unknownAtRules": "ignore", // Ignore Tailwind warnings
  "less.lint.unknownAtRules": "ignore", // Ignore Tailwind warnings

  // ─────────────────────────────────────────────
  // EDITOR BEHAVIOR
  // ─────────────────────────────────────────────

  "editor.detectIndentation": false, // Disable indentation auto-detection, Forces your manual indentation rules
  "editor.snippetSuggestions": "top", // Place snippets at top of autocomplete suggestions
  "editor.emptySelectionClipboard": true, // Copy line if nothing is selected
  "editor.copyWithSyntaxHighlighting": false, // Copy plain text instead of colored syntax

  // ─────────────────────────────────────────────
  // MINIMALIST UI (REMOVE VISUAL NOISE)
  // ─────────────────────────────────────────────

  "editor.minimap.enabled": false, // Disable minimap on right side
  "editor.lineNumbers": "off", // Hide line numbers
  "editor.guides.indentation": false, // Remove vertical indentation guides
  "editor.folding": false, // Optional: remove code folding controls

  // ─────────────────────────────────────────────
  // DIFF / GIT COMPARISON
  // ─────────────────────────────────────────────

  "diffEditor.ignoreTrimWhitespace": false, // Show whitespace differences in git diffs
  "diffEditor.renderSideBySide": true, // Side-by-side diff view instead of inline

  // ─────────────────────────────────────────────
  // NAVIGATION BEHAVIOR
  // ─────────────────────────────────────────────

  "editor.gotoLocation.multipleReferences": "goto", // If multiple results exist, jump directly instead of showing picker
  "editor.gotoLocation.multipleDefinitions": "goto", // If multiple results exist, jump directly instead of showing picker
  "editor.gotoLocation.multipleDeclarations": "goto", // If multiple results exist, jump directly instead of showing picker
  "editor.gotoLocation.multipleImplementations": "goto", // If multiple results exist, jump directly instead of showing picker
  "editor.gotoLocation.multipleTypeDefinitions": "goto", // If multiple results exist, jump directly instead of showing picker

  "workbench.editor.enablePreviewFromQuickOpen": false, // Prevent preview tabs from Quick Open (Ctrl+P)

  // ─────────────────────────────────────────────
  // AI / EXTENSIONS
  // ─────────────────────────────────────────────

  "gitlens.ai.model": "vscode", // GitLens AI model configuration
  "gitlens.ai.vscode.model": "copilot:gpt-4.1", // GitLens AI model configuration

  // ─────────────────────────────────────────────
  // FUN (VS CODE PETS)
  // ─────────────────────────────────────────────

  "vscode-pets.theme": "forest", // Pet theme
  "vscode-pets.throwBallWithMouse": true, // Allow throwing ball with mouse
  "vscode-pets.petSize": "small",  // Smaller pet size

  // ─────────────────────────────────────────────
  // FILE EXPLORER
  // ─────────────────────────────────────────────

	"files.exclude": {
		"**/.next": true,
		"**/node_modules": true
	},
}
⚠️ Heads up: This will replace your existing settings. If you have settings you want to keep, copy specific sections instead of pasting the whole file.
Quick Reference: What Each Section Does
| Setting | Effect |
|---|---|
activityBar.location: "top" |
Moves icons from the side to the top |
statusBar.visible: false |
Hides the bottom bar |
minimap.enabled: false |
Removes the code overview on the right |
lineNumbers: "off" |
Hides line numbers for a cleaner look |
breadcrumbs.enabled: false |
Removes the navigation path above the editor |
editor.folding: false |
Removes code folding arrows |
editor.lineHeight: 1.6 |
Adds breathing room between code lines |
files.trimTrailingWhitespace: true |
Automatically cleans up whitespace on save |
Frequently Asked Questions
Q: Will hiding the status bar mean I can't see my Git branch? A: You'll still see it in the activity bar when you open the Source Control panel. And GitLens gives you much richer Git info anyway.
Q: What if I need line numbers back temporarily?
A: Just open the Command Palette (Cmd/Ctrl + Shift + P) and search for "Toggle Line Numbers" - no need to edit settings.
Q: Can I use a different theme instead of Min Dark? A: Absolutely! The theme setting is completely independent from everything else. Popular alternatives include Tokyo Night, Catppuccin, Dracula, and One Dark Pro.
Q: My font isn't showing up after installation.
A: Make sure you restarted VS Code after installing the font. Also double-check that the font name in settings.json exactly matches the font's name as installed on your system.
Q: Some of my extensions seem to conflict with these settings.
A: The most common culprits are other formatter extensions. Make sure editor.defaultFormatter is set to Prettier, and disable any other formatters that might be interfering.
Final Thoughts
The goal of a setup like this isn't to look cool on Twitter (although, yeah, it does look pretty nice). It's to reduce the cognitive load of your environment so your brain can focus on the actual problem you're trying to solve.
Once you get used to working in a clean, minimal editor, going back to the default VS Code layout feels genuinely overwhelming. Give it a week and I promise you won't look back.
Happy coding! 🎉
Found this helpful? Share it with a fellow developer who's drowning in VS Code.
Frequently asked questions
How do I open the settings.json file in VS Code?
Press Cmd + Shift + P on Mac or Ctrl + Shift + P on Windows and Linux to open the Command Palette, type Open User Settings (JSON), and click the result. This file is the main config for the editor and is where all customization in this setup lives.
Which font and theme are used in this minimalist VS Code setup?
The setup uses Brass Mono as the editor font, with Fira Code suggested as an alternative if you want ligatures, and Min Theme for colors in both Min Dark and Min Light variants. The icon pack is Symbols by Miguel Solorio.
What settings hide the visual clutter in VS Code?
You hide the status bar, breadcrumbs, minimap, line numbers, indentation guides, and code folding arrows by setting workbench.statusBar.visible, breadcrumbs.enabled, editor.minimap.enabled, editor.guides.indentation, and editor.folding to false, plus editor.lineNumbers to off. You can also move the activity bar to the top and disable the command center.
If I hide line numbers, how can I get them back when I need them?
Open the Command Palette with Cmd or Ctrl + Shift + P and search for Toggle Line Numbers, so there is no need to edit your settings. You can also jump to any line with Ctrl + G even while line numbers are hidden.
Which extensions are recommended in this VS Code setup?
Recommended extensions include Error Lens, SonarQube for IDE, Code Spell Checker, and Pretty TypeScript Errors for code quality; GitLens, Prettier, Auto Rename Tag, and Import Cost for workflow; and Tailwind CSS IntelliSense and Image Preview for specific tech. There is also vscode-pets just for fun, which adds a pet that runs around in a panel while you work.